IN THIS ARTICLE
Override a Prefab
When a prefab is open in Prefab Edit Mode, changes to its content are automatically propagated to all instances of that prefab. Sometimes it is useful to alter a prefab instance on its own without affecting the other instances. For example, you might have multiple instances of the same car prefab in a level, but you want each car instance to be a different color. Prefab overrrides allow you to change the properties and contents of prefab instances to make them unique.
| O3DE Experience | Time to Complete | Feature Focus | Last Updated |
|---|---|---|---|
| Beginner | 15 Minutes | Using prefab overrides to make prefab instances unique. | November 20, 2023 |
Prerequisites
- Basic knowledge of working with O3DE Editor.
- A project built from the standard project template or one that contains the Gems in the standard template.
What are prefab overrides?
Prefab overrides are one of the major components of the prefab system. Before overrides, changing a single prefab instance would affect all instances. With overrides, we can make prefabs stand out from the rest of their siblings. Overrides give content creators much more flexibility to build large and complex scenes. It also allows for overriding default procedural prefabs that are imported via .fbx files.
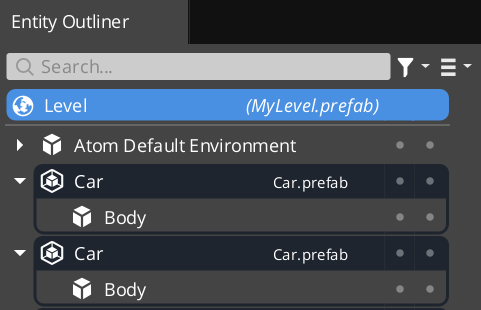
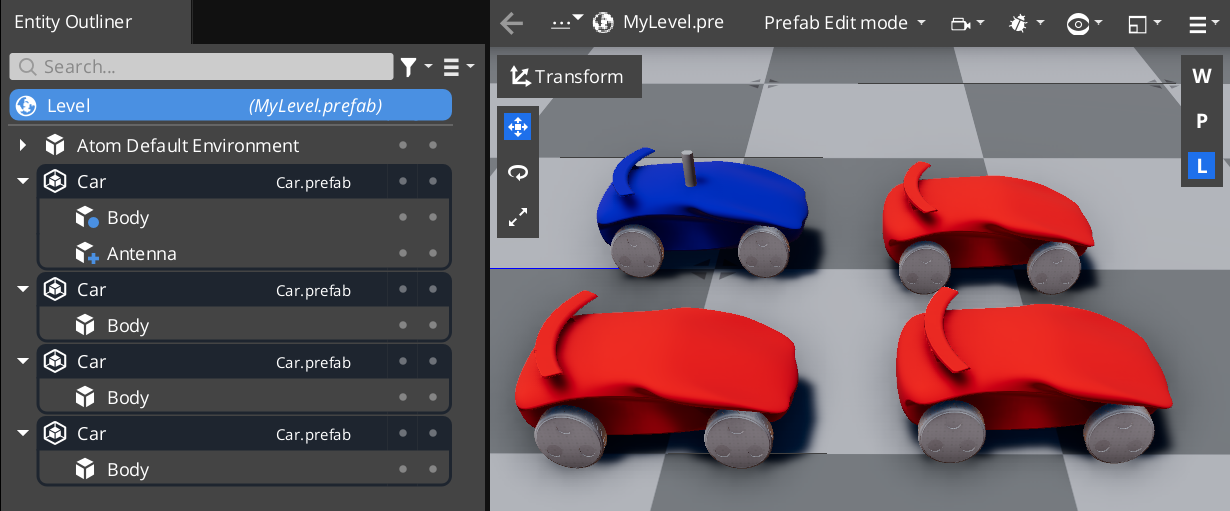
The following image shows two instances of Car prefab in a level. With overrides enabled, the Car instances are expandable and can be opened for editing:
Note:If prefab overrides are disabled, prefab instances in the level cannot be expanded for editing. In other words, you will not see the arrow icon to the left of an instance name.
Overrides applied to prefab instances are registered for that individual instance and are stored in the prefab being edited that contains the instances. In the above example, the Car instances are in a level (which is a prefab), so the prefab overrides applied to the Car instances are stored in the level when you save it.
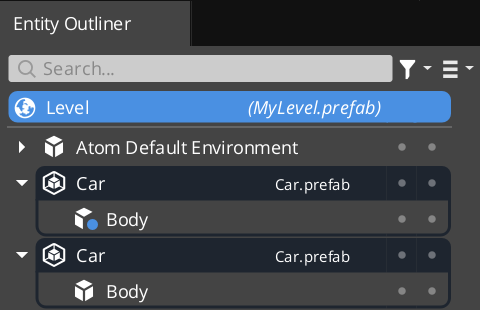
Modifying the Body entity’s location as an override, you notice that a blue circle will appear in the Entity Outliner. This indicates an entity override. Now, if you save the level prefab, the override is also saved.
Note:A level is a prefab, and automatically enters Prefab Edit Mode when it is opened. This is indicated by the blue capsule around the level in Entity Outliner.
Overrides are not limited to the level. In fact, any prefab that is open for editing in Prefab Edit Mode is responsible for storing the overrides made to its nested prefabs.
If you do not want to make override changes, you should follow the old Prefab Edit Mode workflow instead. In this example, you can enter Prefab Edit Mode via the Car instance in the Entity Outliner. Any changes to Car will now affect all Car instances.
You can apply the following types of overrides to prefabs:
- Edit component properties
- Add or remove components
- Add or remove entities
- Remove nested prefab instances
Types of overrides
Edit component properties
To override a component property of an entity under a prefab instance:
- In Entity Outliner, expand a prefab instance by clicking the arrow to the left of the instance name.
- Select an entity under the instance and edit one of its properties in Inspector.
- Notice that a blue circle appears on the entity’s icon in Entity Outliner. This indicates that an override is applied to the entity.
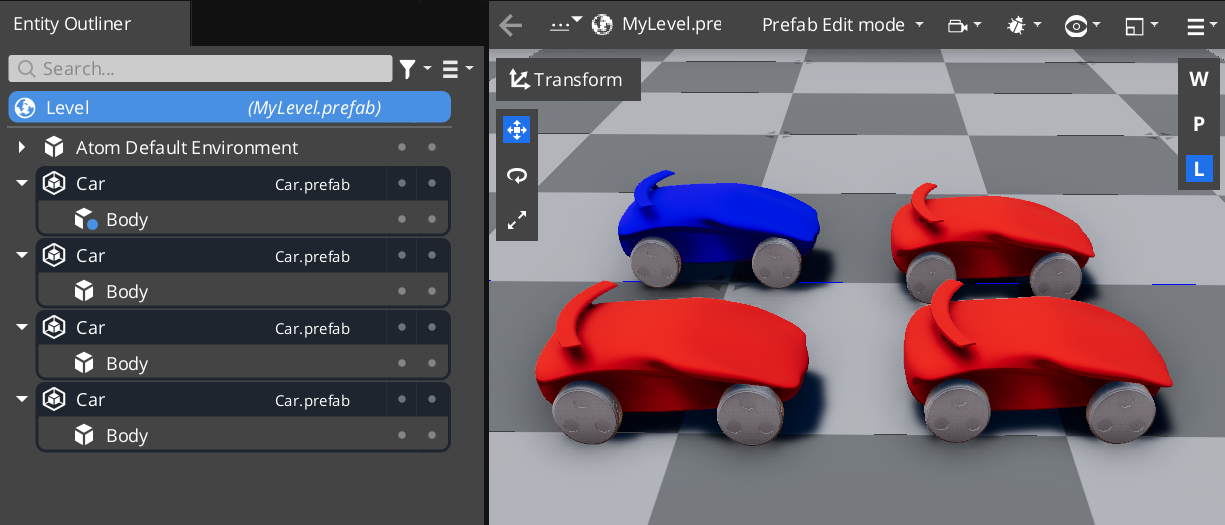
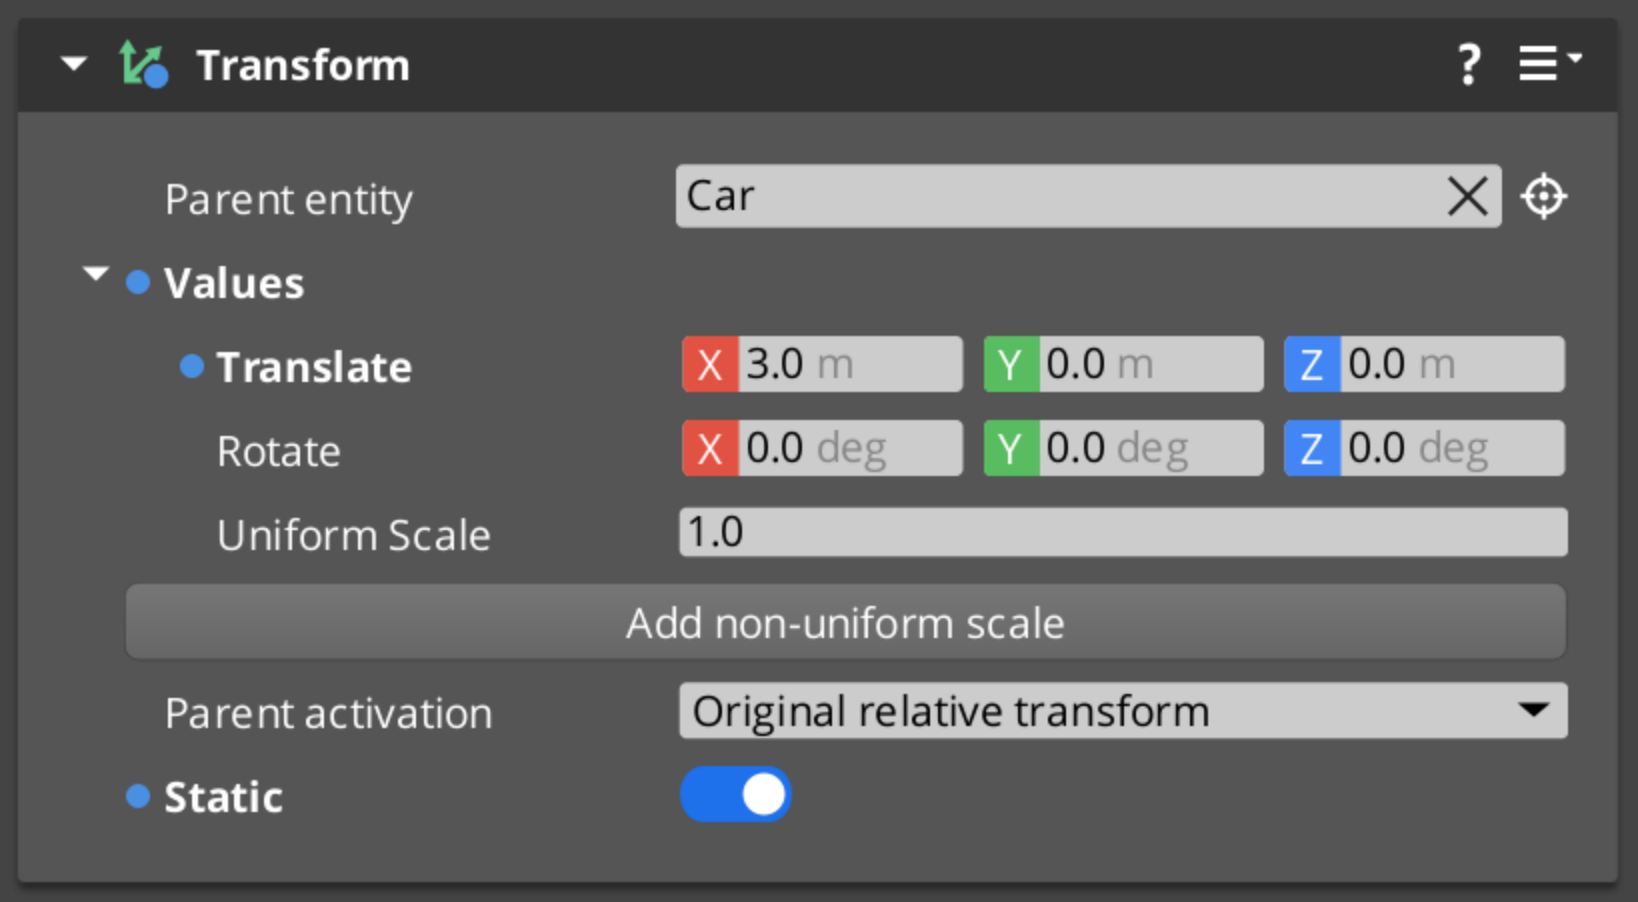
In the below image, the Body entity in the first Car instance has an override to change the default color of the car from red to blue:
When you make an override edit in the Inspector, you will notice that a blue circle appears before the property label and the label text is bolded. In the component header, a blue circle is also shown near the text, which indicates that an owning property value has been overridden.
Add or remove components
To add a component of an entity under a prefab instance:
- In Entity Outliner, select an entity under an instance that is not in Prefab Edit Mode.
- In Inspector, right-click on empty area and choose Hi from the context menu.
- Notice that a blue plus icon appears on the component’s icon to the left of the component name.
To remove a component as an override, you can choose Delete from the context menu instead.
In Inspector, there is no visual indication of a component being deleted as an override at this time. The only way of getting rid of this override edit is through manual edit in .prefab file or the prefab instance being edited. Alternatively, you can revert a deletion by pressing CTRL+Z to go back to a previous state where you delete that component. However, this undo will only work if the editor has not been closed and reopened. After closing the editor, your undo stack has been cleared and you can no longer undo in this manner.
Add or remove entities
To add an entity under a prefab instance as an override:
- In Entity Outliner, right-click on a prefab instance and choose Create entity from the context menu.
- Notice that a blue plus appears on the new entity’s icon in Entity Outliner. This indicates that the entity has been added as an override.
In the below image, an Antenna entity has been added to the first Car prefab instance.
To delete an entity or a nested prefab instance as an override:
- In Entity Outliner, right-click on an entity or a nested prefab instance and choose Delete from the context menu.
- Notice that a blue circle appears on the parent entity’s icon in Entity Outliner. This indicates that a child has been deleted as an override.
Similarly in Entity Outliner, there is no visual indication of an entity or a prefab instance being deleted as an override at this time. You can follow the steps mentioned above to either remove the override in file or to undo the override in Editor.
Note:You cannot revert the deletion by reverting overrides on the parent entity. See the GitHub issue #13437 for more details.
Remove nested prefab instances
In current workflow, it does not support adding a nested prefab instance as an override. However, you can remove a nested prefab instance as an override by following the steps mentioned above for an entity.
Note:Deleting or undoing a prefab instance will not delete the actual prefab off the hard drive.
To remove a prefab permanently, you must delete the prefab file from the Asset Browser or your OS folder operation. We recommend not doing this unless you are sure that prefab does not exist in other levels or other projects that reference it.
Revert an override edit
Once an override has been registered, it will exist until explicitly removed. There are three ways of reverting an override:
- Revert an override on the property
- Revert some overrides on the component
- Revert all overrides on the entity
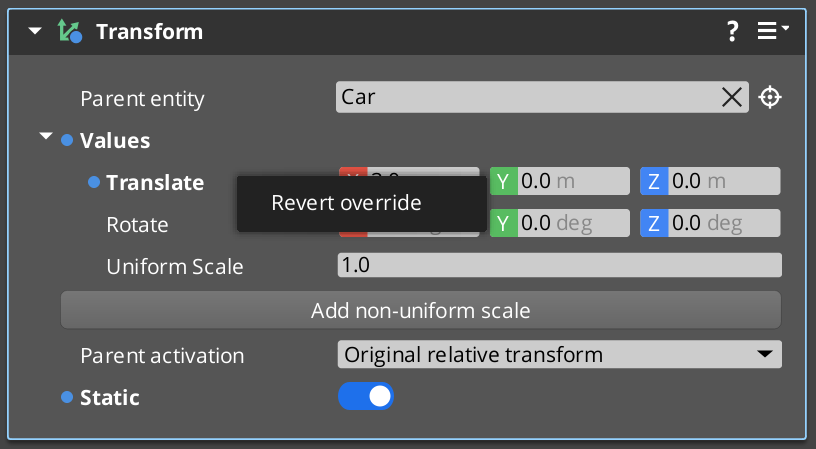
Revert an override on the property
You can revert individual overridden property values respectively:
- In Inspector, right-click on the property label or the blue circle and choose Revert override from the context menu.
- Notice that the property no longer has any indication of having an override.
Revert some overrides on the component
In addition, you can revert all property overrides that are owned by a component:
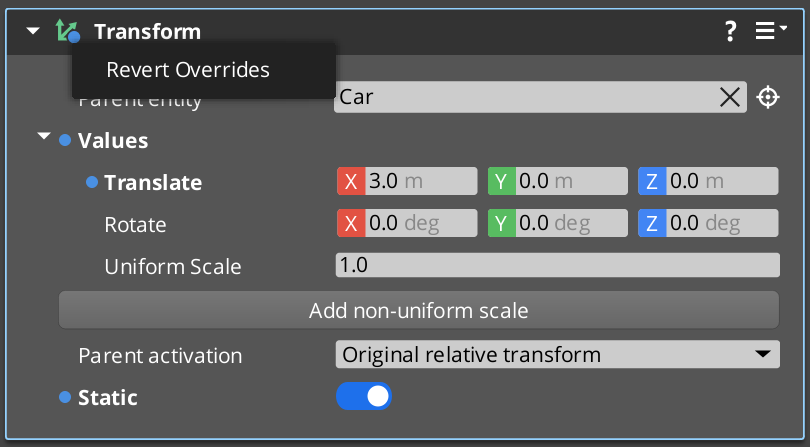
- In Inspector, right-click on the blue circle in the component header and choose Revert Overrides from the context menu.
- Notice that all the properties no longer have any indication of having an override.
For a component added as an override, you can revert the addition in the same way mentioned above. Alternatively, you can delete the component with either of the following methods:
- In Inspector, right-click a component and choose Delete component from the context menu.
- With a component selected, press DEL.
For a component deleted as an override, you can revert the deletion by reverting all overrides on the selected entity. However, be aware that this would remove other overrides if they are present.
Revert all overrides on the entity
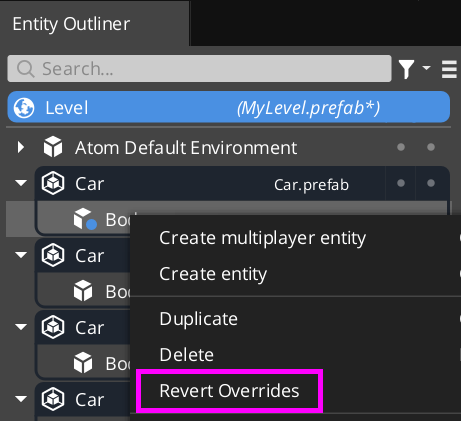
Last but not least, you can revert all overrides applied to an entity:
- In Entity Outliner, right-click on an entity with overrides and choose Revert Overrides from the context menu.
- Notice that the entity no longer has any indication of having overrides.
Note:If you see any unexpected overrides showing up, you can try the above methods to revert them. If it does not work out, you can open the prefab file that owns those overrides (under theInstanceskey) and remove the override patches you want.
Disable prefab overrides
Prefab overrides are a new feature. You may encounter issues that slow down or even block your workflow. You can follow the recommendations below to disable the feature in your project.
First, we recommend that you disable the prefab overrides feature in the Inspector, which should roll back to how it already worked in the 23.05 release.
- Open the Console Variables (CVar) editor in Tool.
- Turn off the
ed_enableInspectorOverrideManagementvariable. - Note that you need to turn off and on the
ed_enableDPEInspectorvariable to make it take effect.
Note:Prefab override management in Entity Inspector is developed based on the new Document Property Editor (DPE) , which aims to replace the old Reflected Property Editor (RPE). Therefore, theed_enableInspectorOverrideManagementflag is dependent on theed_enableDPEInspectorflag.
This will disable the feature in Inspector, but you can still manipulate override edits in Entity Outliner.
Second, if you want to entirely disable the feature in the O3DE Editor, you can follow these steps:
- Open the Console Variables (CVar) editor in Tool.
- Turn off the
ed_enableOutlinerOverrideManagementvariable. - Note that you need to restart the O3DE Editor to make it take effect.
Alternatively, you can change the above flags through a settings registry file with the following contents:
{
    "O3DE": {
        "Autoexec": {
            "ConsoleCommands": {
                "ed_enableDPEInspector": true,
                "ed_enableInspectorOverrideManagement": false,
                "ed_enableOutlinerOverrideManagement": false
            }
        }
    }
}
An example of such file exists as a project-specific override in the AutomatedTesting project:
AutomatedTesting/Registry/editorpreferences.setreg
Note:It is recommended to add your settings registry file to the<project-path>/user/Registrydirectory as a user-specific override. Files in the user directory are ignored by git and will not be tracked for changes.
Last but not least, if disabling the feature does not resolve your issue, you can check the known issue lists:
If you cannot find a related issue, please report it via
GitHub Issue and attach relevant tags (sig/content, feature/prefabs) to the new issue.
Conclusion and next steps
Now that you understand the differences between entities, prefabs, and prefab instances, and the basics of creating and working with them, you can put it into practice. Learn to Spawn and Despawn a Prefab in the next tutorial.