IN THIS ARTICLE
Using Player Input in Open 3D Engine
You can create an input bindings asset for an Input component and specify input events with Open 3D Engine (O3DE) Asset Editor. Use Script Canvas or Lua to map the input events to gameplay logic.
Creating an input bindings asset
To create an .inputbindings file with Asset Editor, follow these steps.
In O3DE Editor, create an entity.
Select the entity in the viewport or Entity Outliner.
In Entity Inspector, click Add Component, and then add an Input component.
In Entity Inspector, find the Input component, and then click
 to create a new
 .inputbindingsfile in Asset Editor.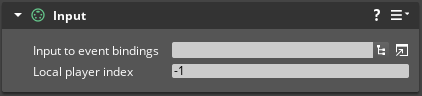
Creating input event groups
You can add input event groups for different actions to the new .inputbindings file.
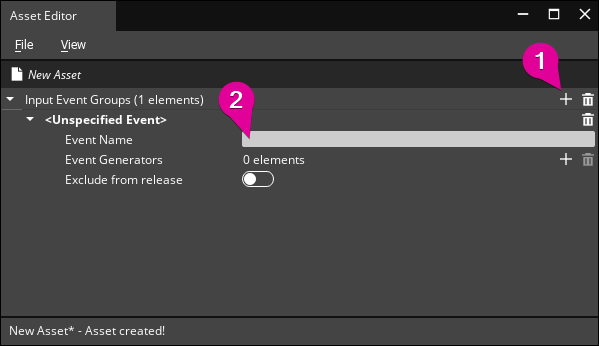
To create a new input event group, click the
 icon.
icon.For Event Name, enter a name for the event, such as
Action.
Creating event generators
After you create an input event group, you can add event generators to the group. An event generator is a handler that generates the named event. For example, a pressed key, a held mouse button, or a series of actions on a game controller results in the named event.
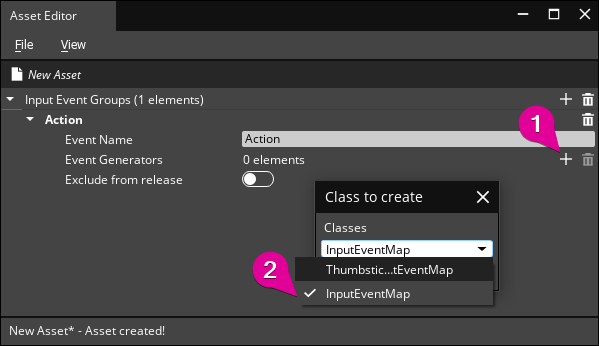
In the new input event group, click the
icon next to Event Generators.In the Class to create dialog box, select
InputEventMap, and then choose OK.Specify changes for the event generator. Each event generator has a set of properties that you can customize.
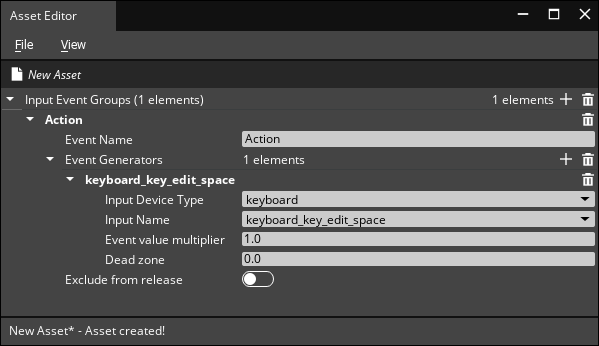
Setting event generator properties
The following .inputbindings file specifies a keyboard for the Input Device Type and the space bar for the Input Name.
Saving your input bindings asset
In the Asset Editor, choose File, Save.
Enter a name for the
.inputbindingsfile, and then choose Save.In Entity Inspector, in the Input component, for Input to event bindings, click
 , and then select your
 .inputbindingsfile.
Mapping input events to gameplay logic
After you create an .inputbindings file and specify input events, you can use Script Canvas or Lua to map the input events to gameplay logic. You can create gameplay logic in a visual scripting environment with Script Canvas Editor or write your own Lua scripts with Lua Editor (Lua IDE).
Using input in Script Canvas
You can create a Script Canvas graph that connects to input events. For more information about scripting with Script Canvas, refer to Creating Gameplay and Other Behaviors with Script Canvas.
In O3DE Editor, select the entity with the Input component in the viewport or Entity Outliner.
In Entity Inspector, click Add Component and add the Script Canvas component.
In the Script Canvas component, for Script Canvas Asset, click
, and then create a new Script Canvas graph like the following example.
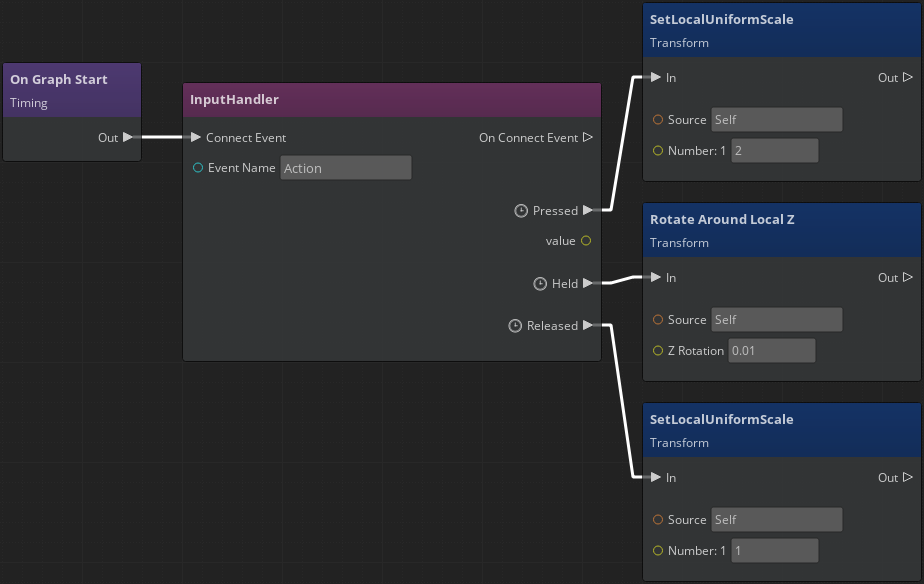
Example Script Canvas graph
In the following graph, the InputHandler node connects Action events to various Transform nodes. When the state of an event generator changes, the Input component sends Pressed, Held, and Released events to the InputHandler node.
Using input in Lua
You can also create a Lua script that connects to input events. For more information about scripting with Lua, refer to Writing Lua Scripts.
In O3DE Editor, select the entity with the Input component in the viewport or Entity Outliner.
In Entity Inspector, click Add Component, and then add the Lua Script component.
In the Lua Script component, click
.In Lua Editor, create a table of the functions
OnPressed,OnHeld, andOnReleasedfor an input event that you want to connect the script to.Create a bus handler by connecting to the
InputEventNotificationBuswith the first parameter set to the table of functions for the input event. The second parameter is anInputEventNotificationIdfor the Event Name.
Example Lua script
The following Lua script connects Action events to the individual functions OnPressed, OnHeld, and OnReleased.
local tutorial_input = {
    Properties = {}
}
function tutorial_input:OnActivate()
    self.ActionInputs = {}

    self.ActionInputs.OnPressed = function(_, value)
        TransformBus.Event.SetLocalUniformScale(self.entityId, 2.0)
    end

    self.ActionInputs.OnHeld = function(_, value)
        TransformBus.Event.RotateAroundLocalZ(self.entityId, 0.01)
    end

    self.ActionInputs.OnReleased = function(_, value)
        TransformBus.Event.SetLocalUniformScale(self.entityId, 1.0)
    end

    self.ActionInputHandler = InputEventNotificationBus.Connect(self.ActionInputs, InputEventNotificationId("Action"))
end

function tutorial_input:OnDeactivate()
    self.ActionInputHandler:Disconnect()
end

return tutorial_input
Testing player input
After you use either Script Canvas or Lua to connect the input event in your .inputbindings file to an input handler, you can test player input in O3DE Editor.
In O3DE Editor, select the entity with the Input and scripting components in the viewport or Entity Outliner.
Note:In this example, the entity must have a component that enables visibility in the game, such as the Mesh component, the White Box component, or one of the Shape components.In Entity Inspector, click Add Component, and then add the Mesh component.
For Mesh asset, specify a mesh asset file. This gives your entity a shape that is visible in game mode.
To enter game mode, press Ctrl+G.
Press Space bar so that your entity rotates on the local z-axis. The entity’s scale doubles when the event
OnPressedis received from the input handler that is connected toAction. The entity’s scale returns to normal when theOnReleasedevent is received.To exit game mode, press Esc.