Using Record Mode
The Track View’s Play toolbar has the Start Animation Recording icon to enter record mode. In record mode, you can manipulate component entities for a sequence directly in the viewport. Animation keys are automatically placed on the appropriate node tracks in the timeline based on the current location of the timeline playhead.
To use record mode
In the Track View, select or create the sequence that you want.
In the Play toolbar, click the Start Animation Recording icon.
In the viewport, manipulate a component entity that is part of your sequence. Your changes will appear in the timeline as animation keys.
To stop recording, click the Start Animation Recording icon again.
Note:You must move the playhead to different locations on the timeline in order to have an animation play over time. Otherwise, you will override the keys at the same timeline location as you manipulate the component entities in the level.
You can also use the Start Auto Recording option. When you choose this option, the playhead automatically moves along the timeline at the specified time. The default is one second. This means that the playhead skips ahead every one second. You can specify a lower value, which means the playhead sets keys more frequently. However, this can result in many keys that you must modify after you are finished recording.
To start auto recording
In the Track View, select or create the sequence that you want.
In the Play toolbar, click the Start Auto Recording icon. The playhead automatically moves in the timeline based on the setting specified in the drop-down menu.
In the viewport, manipulate a component entity that is part of your sequence. As the playhead moves and you make changes to component entities, your changes appear in the timeline as animation keys.
To stop auto recording, click the Start Auto Recording icon again.
Example 1: Recording Component Entity Changes The following example uses the Transform component, but the same idea applies to any component tracks that are specified as animation keys in the sequence. In record mode, you don’t need to manually set keys each time you make changes to your component entities.
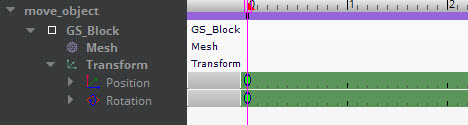
In a level, you have a component entity that is part of a sequence.
By default, the Transform component on the component entity already has tracks in the sequence for the Position and Rotation properties.

- To maintain the current position and rotation of the game object, add animation keys for both tracks at
0on the timeline.
Select and drag the playhead to a different location on the timeline. This example moves the playhead to
1second.Move the Track View window to the side or dock it so that it’s still open but not blocking the viewport for the currently open level.
Click the Start Animation Recording icon to enter record mode.
In the viewport or the Entity Outliner, select the component entity.
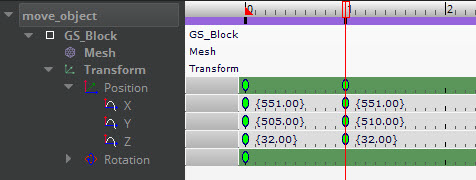
Use the Transform tool to move the entity farther back into the level. You can also enter different values in the Transform component properties.
View the timeline for the sequence. New keys appear on the Position track at
1second.
Move the playhead to where you want to set another animation key and then adjust the property values again.
When finished, click the Start Animation Recording icon again to exit record mode.
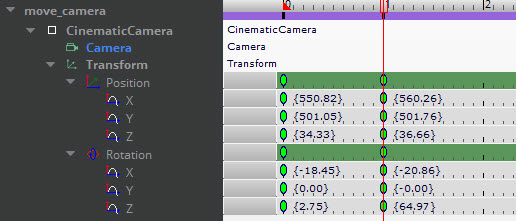
Example 2: Recording Camera Movement from Camera View The following example shows how you can add animation keys automatically in the sequence as you position your camera within the level from the perspective of the specified camera.
In a level, you have a component entity with the Camera component that is part of your sequence.
By default, the Transform component on the component entity has tracks in the sequence for the Position and Rotation properties.
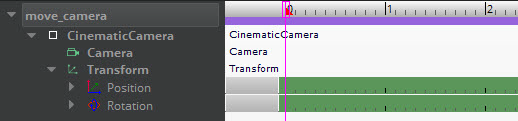
- To maintain the current position and rotation of the game object, specify the animation keys on both tracks at
0on the timeline.
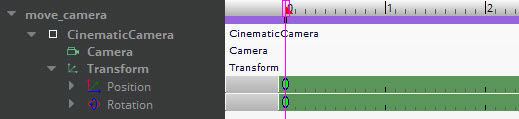
Move the playhead to a different location on the timeline.
Move the Track View window to the side or dock it so that it’s still open but not blocking the viewport for the currently open level.
Click the Start Animation Recording icon to enter record mode.
In the left-corner of the viewport window, right-click Perspective and choose Camera and then specify the camera that is part of your sequence. The text will change from Perspective to Camera entity: NameOfYourCamera.
While you are viewing from the perspective of the camera, when you move in the level, the camera will move as well. This includes any rotations. In record mode, this adds animation keys at the current playhead location.
Move the playhead when you need to set another animation key in the timeline and then move the camera view around in the level.
When finished, click the Start Animation Recording icon again to exit record mode.