IN THIS ARTICLE
Setting up O3DE from GitHub
Getting the source for Open 3D Engine (O3DE) from GitHub is a great way to set up your development environment. This method lets you easily sync future engine updates and make contributions to the open source project base. For instructions on setting up O3DE from GitHub, check out the following video or the tutorial on this page.
The video and written instructions in this section guide you through the following steps:
- Configure credentials for Git LFS.
- Fork and clone the O3DE GitHub repo.
- Build the O3DE engine.
- Register the engine.
Prerequisites
The GitHub setup instructions assume that you have:
- Git client installed (1.8.2 or later required, 2.23.4 or later recommended).
Configure credentials for Git LFS
The O3DE GitHub repo uses the Git Large File Storage (LFS) system for storing large binary files. The following instructions will prepare your PC to authenticate and download these files automatically when you clone, fetch, or pull from the repo.
To configure for Git LFS
Verify that Git LFS is installed.
git lfs installIf the output from this command is “Git LFS initialized”, then you already have Git LFS installed. If you didn’t have Git LFS installed, this command will install it for you.
sudo apt install git-lfsVerify that you have a credential manager set up for Git. Recent versions of Git install a credential manager to store your credentials so that you don’t have to enter them for every request.
git config credential.helperCommon examples of results to this
git configcommand includemanager-core,wincred,osxkeychain, andcache. However, if you don’t see anything in response to this command, you can install Git Credential Manager Core as your credential manager.Create a GitHub personal access token with
repoandread:orgscope.Go to https://github.com/settings/tokens .
(GitHub menu equivalent: Settings > Developer Settings > Personal Access Tokens)
Choose Generate new token.
(Optional) Add an entry under Note. This is only for your reference. You can use it as a personal reminder of what the token is for.
Under Select scopes, select the following:
repo(all)read:org(under admin:org)
Choose Generate token. Keep the token handy (but private!) for use in later steps.
Important:This token can be used in place of your GitHub password, so protect it just as you would your GitHub password!
Fork and clone
All contributions to the O3DE repo are expected to be staged in a fork before submitting a pull request. Refer to the documentation on Contributing to O3DE Code Sources in the O3DE Contributor Guide for details about the contribution workflow.
To fork and clone O3DE on your PC from GitHub
Create a fork of the O3DE GitHub repo from https://github.com/o3de/o3de . Alternatively, if you are working as a member of a team that has already created a fork, you can skip this step and use your team’s existing fork.

For general instructions and help with creating and using forks in GitHub, see the GitHub Guide on Forking Projects .
Clone your forked repo. Use your preferred Git UI or a command line to clone the repo in a directory of your choice. You will need your GitHub username and the personal access token that you created earlier.
Clone the repo from a fork.
# Cloning from your personal fork.
git clone https://github.com/YOUR-USERNAME/o3de.git

# Cloning from your team's fork.
git clone https://github.com/TEAM-FORK/o3de.git
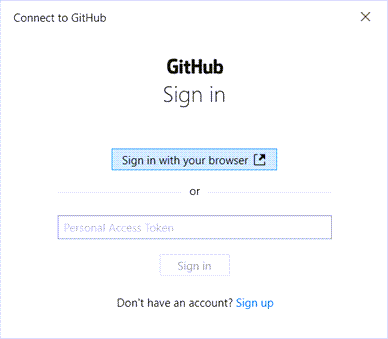
If you are shown a Connect to GitHub dialog box, sign in to GitHub as instructed, using either your browser or your personal access token.

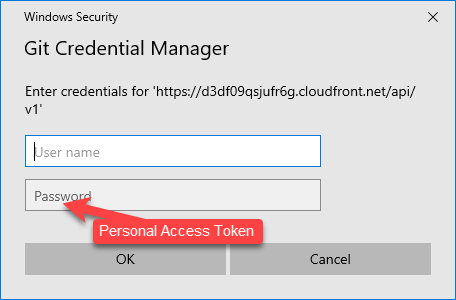
Enter your credentials for the LFS endpoint in the next sign in dialog box. Use your GitHub username and your personal access token for the password.

Verify you have the LFS files.
When the clone operation completes, verify that you have all of the files from the LFS endpoint. You should no longer receive credential prompts.
# Change to the directory name that was created when you cloned the engine repo.
# The default is o3de.
cd o3de

git lfs pull
Add a remote to track the upstream repo. This will enable you to pull updates from the O3DE repo directly into your local clone.
git remote add upstream https://github.com/o3de/o3de.gitVerify the upstream repository. You should see the URL for the fork as
origin, and the URL for the original repository asupstream.git remote -vOutput:
origin  https://github.com/<FORK>/o3de.git (fetch)
origin  https://github.com/<FORK>/o3de.git (push)
upstream        https://github.com/o3de/o3de.git (fetch)
upstream        https://github.com/o3de/o3de.git (push)
(Optional) If you don’t expect to make changes to these files, ignore this step. Otherwise, update the LFS URL to include your fork. This lets you push changes to files in the LFS. For complete instructions and the DISTRIBUTION to use, open the
.lfsconfigfile at the root of the repository.git config lfs.url https://<DISTRIBUTION>.cloudfront.net/api/v1/fork/<FORK>You might be prompted to re-authenticate the next time that you pull or push. Remember to use your GitHub personal access token, and not your GitHub password.
If you wish to revert this change, you can run the following command:
git config --unset lfs.urlAny time that you want to sync the latest files from the repo and LFS, you can merge changes from the upstream branch you are working with. The default branch is development.
git fetch upstream
git merge upstream/development
In a typical contributor workflow, you will primarily work from a branch off of your fork’s development branch. You can use the git
switchcommand to create your local working branch and set it to track the upstream development branch.git fetch upstream git switch -c <NEW_WORKING_BRANCH> upstream/developmentWhen set up to track an upstream branch, you can use the git
pullcommand whenever you want to sync the latest changes from upstream.git pull
For more information and examples of common contributor workflows, refer to O3DE Code Contribution GitHub Workflow in the Contributor Guide.
To complete setup, proceed to the engine build and registration instructions that match your platform.
